Analino
An experience report building a clone of an open source project about a small toy monster.
Introduction
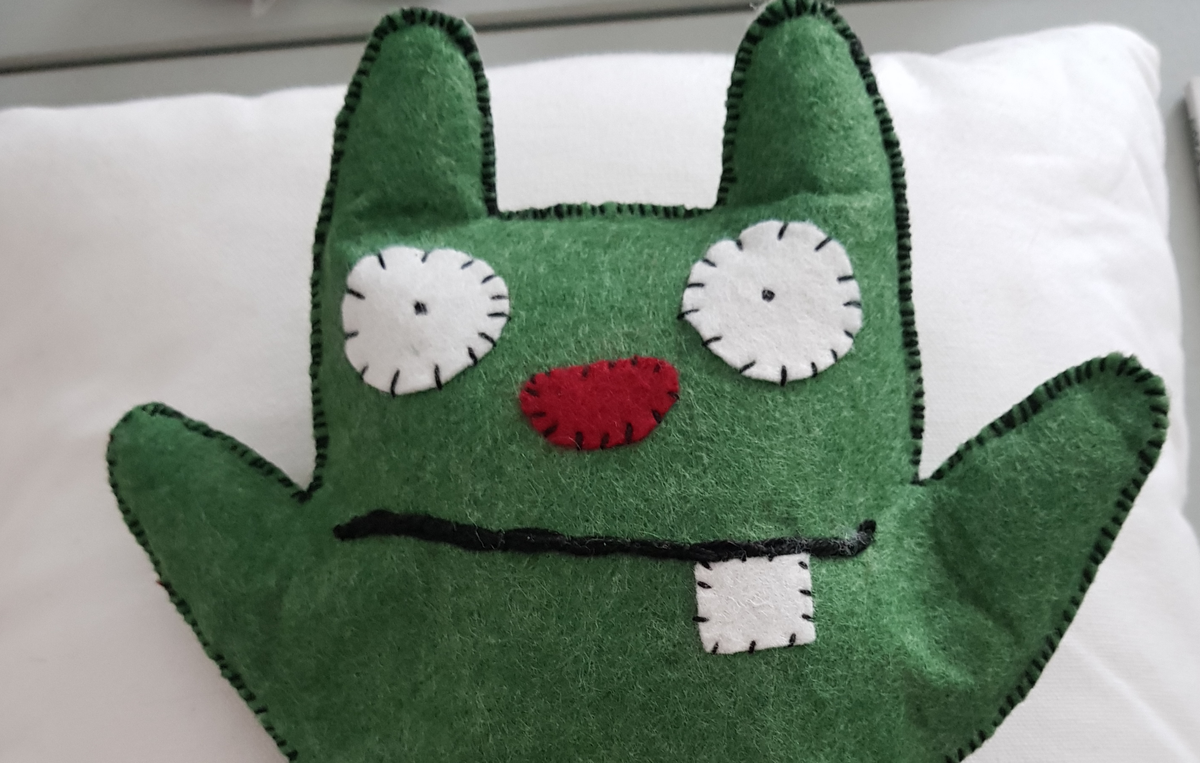
Inspired by this little fellow above I wanted to build my goddaughter a similar companion for her upcoming birthday. Her name being Ana the project was dubbed Analino. A quick advice to anyone who thinks that it would be a great idea as well I can only advice to either start well (weeks) in advance and only announce once you're done :).
The original project linked above builds a simple little toy-monster that gives out snarky remarks when left alone for too long as well as playing a sound when its belly is pressed (tickled). My version follows this behaviour and the most noteworthy addition was the contactless charging. This eliminated the need for any external sockets or cables.
My own design had the size increased by 1.5 to make room for the modified electronics and to accomodate for the fact that I used felt instead of fleece cloth, but more on how that turned out later.
Parts list
Electronics
- Adafruit Feather 32u4 Proto
- Adafruit MusicMaker Featherwing
- Some random 3W speaker from a friend. But you can use a VISATON K20.40 from reichelt.de
- Some wire (stranded for the speaker and 22awg solid core for power and board connections)
- 1200mAh Lipo battery
- Universal Qi Wireless Receiver Module
- Tactile switch 12x12x6 [mm]
- Tactile On-Off switch
- Qi charging pad
- Perma-Proto Board 1/2 size
Monster
- Thick green felt mat for the outside body (his skin)
- Thin red and white felt for the eyes, tooth and nose
- Thick black thread. To stitch the monster up as well as for the mouth.
- White craft foam sheet (for padding electronics see gallery)
- Old transportation pass (structural support for Qi coil)
- Duct Tape (To tape the Qi-coil to the pass)
Tools
- Soldering iron
- Wire cutter
- Sewing kit (Needles, scissors)
- Teddy-stuffing
Code
The original code was meant to run on an Atmel AtTiny being flashed from an Arduino. I used the the Adafruit Feather because it has built-in battering charging and there was a matching Sound module (FeatherWing in Adafruit speak) available. That also meant that I had to change the code. I ended up modifying the provided example code that came with Music Maker FeatherWing. Due to the time constraints and an unpleasant experience with the Atmel Watchdog at 3.00 AM in the morning I decided to leave the advanced power management for version 2.0 ;).
Putting it together
Stiching the monster together was done with the help of my dear mother who is vastly more talented with a needle than me.
Below is a gallery of the different stages. The orginal printout was magnified by simply printing it at 1.5x the size. I didn't use any fancy tool but only set the percentage in the printing dialog to 150% and enabled the poster mode which prints the document in full size on multiple pages instead of scaling it down to fit on a single sheet of A4.
Printout

Pouch


Cutting out the monster


Funny faces
Trying out different expressions for its face.


Packaging electronics components


The Qi coil comes as a bare circuit and as such it is quite exposed.
The black square is actually just some soft plastic sheet that protects the electronics from the electromagnetic radiation coming from the charger. This means that you have to pay attention which way you place the coil. The copper wire needs to face towards the charger.
That being said, the coil needs some frame or base to prevent it from being squished and twisted. This is why I taped it to an expired transportation pass. It is amazing how strong and sturdy they. I couldn't find anything in the house which was more robust at this size.
Electronics -> Black protector sheet -> Coil -> Qi-charger

The Qi-coil did not have any wires attached but soldering them to the circuit-foil was easy. Though I was still worried about it breaking. This is why I bent over the wires when I taped everything together to create some stress-relief.


Analino is definitely a Marsupial with the pouch and all.
Soldertime
Now that we know that everything fits, we can solder it in place.


It lives

Electronics and Code
The code will be made available shortly on my github.com account. And I'll also try to make a fancy drawing of the wiring.
In the meantime here is a short description:
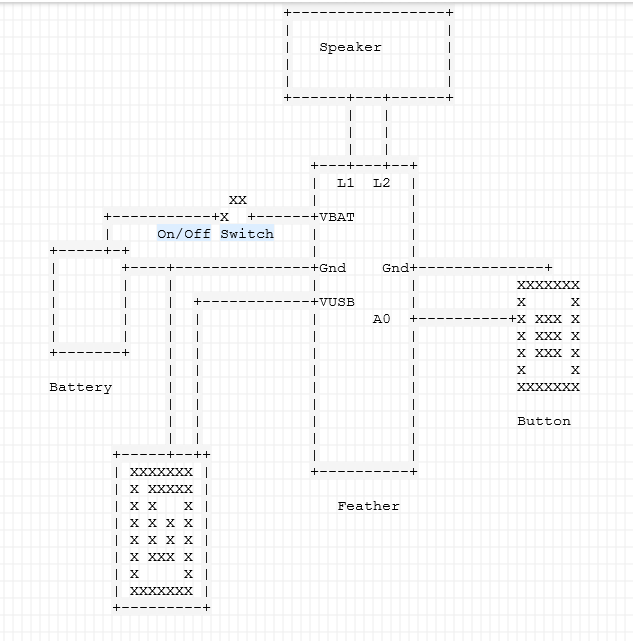
First assemble and test the Feather and Wing according to their tutorials:
The battery is connected to GROUND and VBAT with the VBAT lead connected to the On-Off switch which is located in the left leg. This acts as the main power switch which really turns off the whole thing except when being powered by the Qi charger. I had to put the switch in-between instead of connecting it to the ENABLE pin because the Music feather would still draw power from the Battery and Qi/USB even when the 3.3V regulator was turned off. With that I had two problems; the FeatherWing and Speaker would stay on which would produce a bit of noise and exhaust the battery faster, but really the biggest problem was that I would get sd-card errors when it turned back on.
To charge it you need to leave the monster turned on. This is not ideal as the little fella will pipe up once in a while but really that is part of the charm isn't it. As mentioned earlier the FeatherWing will draw power from whatever power source has the highest voltage. This will actually turn Analino on when placed on the Charger even though the battery is disconnected since the Qi-pad is tied to the usb power lines.
Final words
If I ever lacked motivation to finish a project it certainly wasn't this one. Since I ordered the parts a bit late it meant that I had to postpone handing it over until after the birthday party but still I think it turned out well enough. The change in material also meant that we had to remove most of the stuffing to prevent the button from being contineously pressed. I think using cloth might have mitigated this problem.
Disclaimer:
As is obvious from the parts list , I am a huge fan of Adafruit products. I want to take the opportunity to explain why. First there is a local reseller not too far away that allows next-day pickup for stuff in their warehouse. This is super convenient and I like supporting a local company (They also have a super nice Lego store next to the pickup counter).
I am in no way associated with either Adafruit or ES Electronics-shop or any other store apart from being a customer. If you are in Luxembourg you should also check out the Bastelkiste store. That's where I got most of the crafts materials.